Monday, June 30, 2014

Coffered Ceilings

When walking through model homes, I always look for architectural details.  One that especially gets my attention are coffered ceilings.  Something about them makes the room feel so much grander and finished.  I would love to have them in our dining room but our downstairs is open with no walls to separate the dining room from the rest of the space.


We've even kicked around the idea of adding them in the master bedroom since we have a trey ceiling.


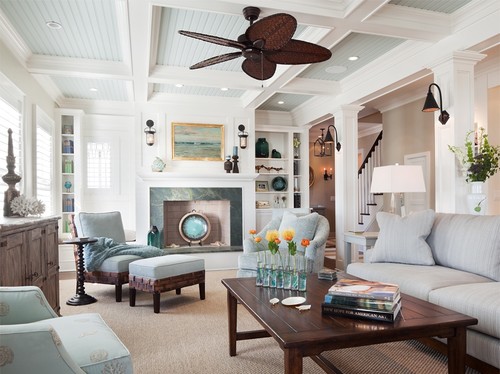
 This one is more board and batten but I think would be fairly easy to do.

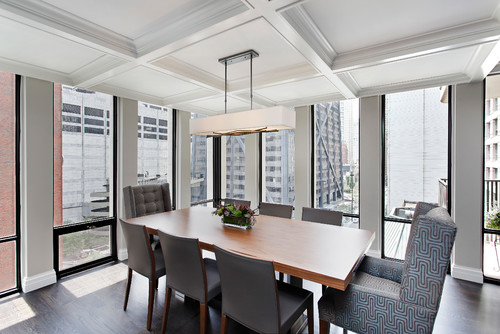
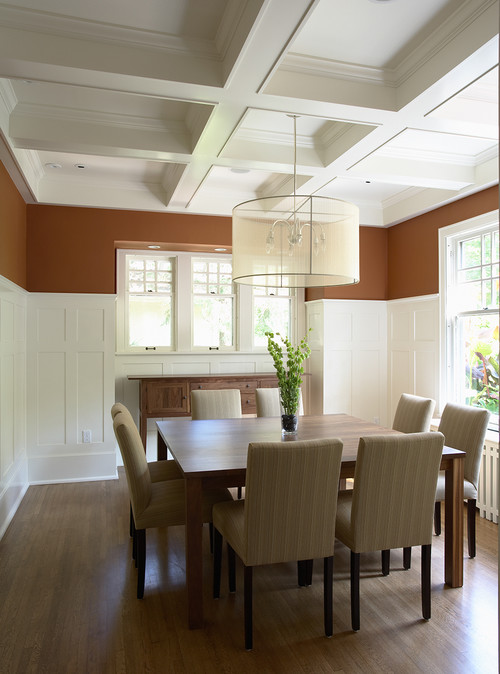
Do you love coffered ceilings too?

 
You're reading Coffered Ceilings by Andrea, originally posted on Decorating Cents.  If you've enjoyed this post, be sure to follow Andrea on Facebook, Pinterest, Bloglovin, and Hometalk.

Sunday, June 29, 2014

Country Home Magazine...

Country Home Magazine came to my home and took some fun images... go check out the new issue!


I loved seeing Bonnie Broten in her element stage our home so beautifully!  She will always be a dear friend!  Thanks Bonnie for making it all happen!

Friday, June 27, 2014

Friday Five

Well, it's the last Friday in June.  It seems like this summer is just passing us by.  We're headed out of town again this weekend so I don't see any projects going down.  I've tried to do a few things here and there to keep me from totally going stir crazy.  I have to be doing something all the time.  Ask my husband.  I tend to be a busy body.

1) With Target's outdoor clearance happening right now, I was able to get this outdoor furniture set for cheap.  $212 to be exact.  That's cheaper than the the regular price of the loveseat alone.  The pieces in this set were marked down 50% with the exception of the table.  It was marked down 70%.  I used the Cartwheel deal that gave me an additional 10% and then 5% with my Redcard.  I stopped in yesterday to grab a few pillows and there wasn't much left so hurry in if you want to get anything.
 

2) I absolutely love this black and white boys room.  I usually love color in a room but this palette was done so well.  Maybe the next room for one of my kids will be black and white.


3) I told you about Apartment Therapy's Small Cool Contest a few weeks back.  They have announced the winners.  For the United States, this 350 square foot apartment owned by a couple in Brooklyn won.  They really got a lot of wow in such a tiny space.


The international winner was this 947 square foot home in Croatia.  The whole home was done in black and white with pops of color.
 

4) I received my new Canon Rebel camera last week and have reading so many great photography sites.  I've really been sucked into this one.  There are so many cool things I can do with this camera and I'm excited to learn how.  If you have any camera tips and tricks, send them my way!
 

5) I use Picmonkey to edit my photos because it's so easy.  I haven't had the time to sit down and learn Photoshop.  Seems a little too complicated.  Recently they added a feature where you can upload and use your own fonts.  Picmonkey's selection is limited.  I have saved so many pages of fonts and now I can use them.
 

Happy Weekend everyone!  Enjoy the last one of June.  Where is summer going?

 
You're reading Friday Five by Andrea, originally posted on Decorating Cents.  If you've enjoyed this post, be sure to follow Andrea on Facebook, Pinterest, Bloglovin, and Hometalk.

Wednesday, June 25, 2014

DIY Decorative Box

I was browsing through Homegoods a couple weeks ago and came upon the aisle with decorative boxes.  I stuck a few in my cart and kept moving.  Before heading to checkout, I decided to put them back.  I liked the pattern of the boxes but wasn't that in love with the color.  I knew I could make my own.
 

I always keep shoe boxes because I never know when they'll come in handy.  I pulled out a small one and some scrapbook paper.  These would be perfect to make my own box.  


I simply cut and wrapped the scrapbook paper around the box like I was wrapping a present.  I adhered the paper to the box with mod podge.
  
After my paper was on, I gave the whole outside a coat of mod podge to seal it and give it a nice sheen.
 

I wasn't sure exactly where my box was going initially but it ended up on the expedit in the entry hall.  It's the perfect perch for my DIY sphere.


Even though I've had this scrapbook paper forever, I still love the pattern and mix of blues.
 

I switched up a few of the accessories on the expedit too.  The blue vase on top is from Homegoods.  The white bird used to sit on the side table in the family room.  With my son walking now, I was afraid it was going to get knocked off on his head.  I picked up a gold urchin from Target.  I still like my DIY urchin that sits on the coffee table in the living room but it didn't hurt to have a real one.


I like changing things up a bit.  Sometimes I walk through the house looking for things I can change.  I still like my blue frames too.  I need to make this gallery larger and put up more photos.


All it took was a walk in Homegoods to get me to re-arrange the items here.  Glad I could add a little more blue.


You're reading DIY Decorative Box by Andrea, originally posted on Decorating Cents.  If you've enjoyed this post, be sure to follow Andrea on Facebook, Pinterest, Bloglovin, and Hometalk.

Sharing with
The Blissful Bee * DIY by Design * Ginger Snap Crafts * Simply Designing * Persia Lou * Embracing Change * A Creative Princess * House of Rose * Chic on a Shoestring Decorating * Just Us Four * Remodelaholic * The 36th Avenue * Simply Sweet Home * The Answer is Chocolate * The Grant Life * The Shabby Nest * A Bowl Full of Lemons * A Stroll Thru Life * Elizabeth and Co * Home Stories A to Z * Homework * Kammy's Korner * Sugar Bee Crafts * The Gunny Sack * The Winthrop Chronicles * Thrifty Decor Chick *

Monday, June 23, 2014

Kids Art Caddy

I originally shared this project on Its Overflowing, but I wanted to make sure you guys didn't miss it.

My daughter loves to draw and craft.  However, her craft supplies are everywhere.  She's got markers and crayons downstairs and another stash upstairs in her room.  She also needs these items for homework sometimes.  It was always a pain trying to keep up with where everything was.  I decided it was time to change that.  She needed one spot where she could keep all her things.

 
I went to the dollar store to see what items they had that I could use.  I came out with a small bucket and this chalkboard.


I wanted to label the bucket.  I cut the chalkboard into a small rectangle so I could attach it to the front.  It was cardboard so it was very easy to cut with scissors.  I was originally going to paint a square on the front of the bucket with chalkboard paint but this was way easier.

 
I attached it to the front with double sided tape.  I keep a drawer of craft stuff too.  That also needs to be organized but that's another post.  I like to keep the cans from canned foods.  They come in handy for things like this.  I grabbed three since that's what would fit in my caddy.  I gathered up my daughter's markers and colored pencils.  I also rounded up stray pencils and scissors.  These supplies fit perfectly in the cans.


Now she has a caddy to keep her art supplies.  She can bring it downstairs when doing homework or take it to her room when she wants to be by herself.


You're reading Kids Art Caddy by Andrea, originally posted on Decorating Cents.  If you've enjoyed this post, be sure to follow Andrea on Facebook, Pinterest, Bloglovin, and Hometalk.

Sharing with